Amazon Nova Canvas’s real -world applications for interior design and product photography
While generating the image of it becomes increasingly essential for the course of modern business work, organizations are looking for practical ways to implement this technology for specific industry challenges. Although the potential of image generation it is wide, many businesses struggle to implement it effectively in their unique cases of use.
In this post, we consider how Amazon Nova Canvas can solve real -world business challenges through advanced image generation techniques. We focus on two cases of specific use that demonstrate the power and flexibility of this technology:
- Interior design – Segmentation image conditioning helps internal designers to repeat rapidly through design concepts, dramatically reducing the time and cost associated with the creation of client presentations
- Product – Outpainting enables product photographers to create various environmental contexts for products without extensive photosessions
Whether you are an interior design firm that seeks to run your visualization process or a retail business that aims to reduce photography costs, this post can help you use advanced Amazon Nova canvas features to achieve the specific objectives of your business. Let them dive into how these powerful tools can transform the workflow work flow.
PRECONDITIONS
You must have the following prerequisites:
Interior design
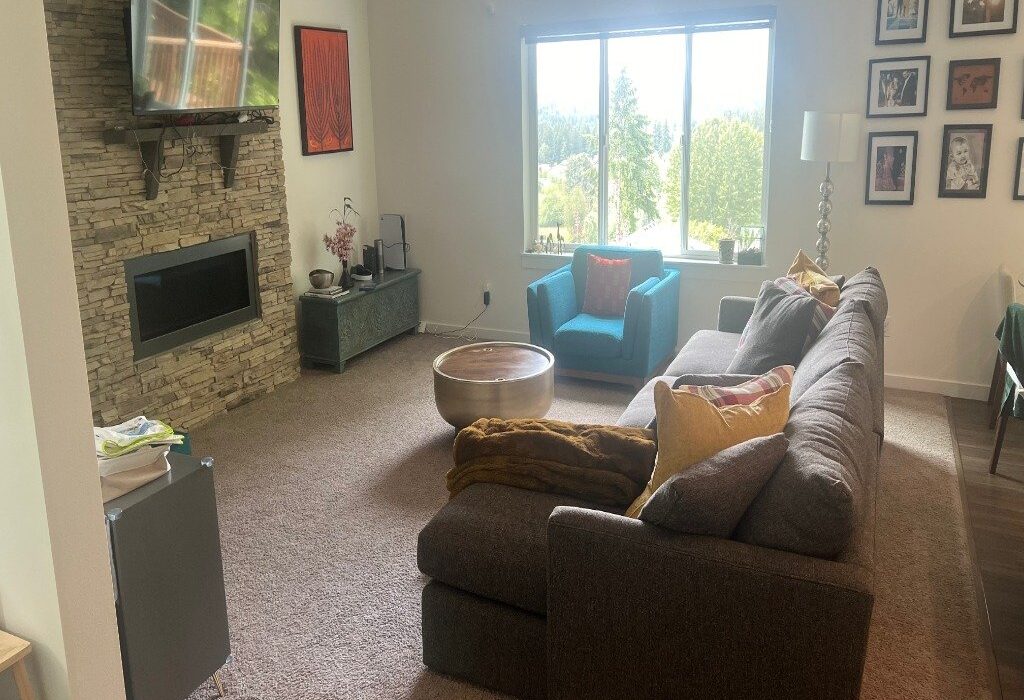
An interior design firm has the following problem: their designers spend hours creating photorealist models for client presentations, needing numerous repetitions of the same room with different topics and decorative elements. Traditional 3D ranking is time and expensive. To solve this problem, you can use the features of the Amazon Nova canvas image conditioning (segmentation) to quickly repeat existing room photos. The image of the condition is analyzed to identify the prominent forms of content, resulting in a separation mask that guides the generation. The generated image closely follows the image of the condition while allowing the model to have creative freedom within the limits of each area of content.
The following images show examples of the initial input, an input -based separation mask, and output based on two different instructions.
 |
 |
| The image of a living room | Living room segmentation mask |
 |
 |
| Fast: a minimalist living room | Fast: a living room with the coastal beach |


This post demonstrates how to maintain structural integrity while transforming the interior elements, so you can generate multiple changes in minutes with simple incentive and input images. The following code block represents the structure of the API requirement for the image air conditioning. The parameters to perform these transformations are transferred to the model through the API request. Make sure the output image has the same dimensions as the entry image to avoid distorted results.
taskType The object determines the type of operation being performed and has its own set of parameters, and imageGenerationConfig The object contains general common parameters for all types of tasks (except background removal). To find out more about the structure of demand/response to different types of generations, refer to the structure of demand and response to image generation.
The following code Python demonstrates a generation of image air conditioning by calling the Amazon Nova Canvas V1.0 model in the Amazon Bedrock:
Product
A sports shoe company has the following problem: they have to display their new ranging new shoes in multiple environments (runway, outside, and more), requiring expensive location shoots and numerous photography sessions for each variant. To solve this problem, you can use Amazon Nova canvas to generate different shots from a single photo of the product. Outpainting can be used to replace the background of an image. You can instruct the model to store parts of the picture by providing a quick mask, for example, “shoes”. A mask speed is a description of the natural language of objects in your image that should not be changed during exit. Then you can generate shoes in different backgrounds with new instructions.
The following images show examples of the starting entry, a mask created for “shoes” and output based on two different instructions.
 |
 |
| Photo in the studio of shoes for jogging | The mask created for “shoes” |
 |
 |
| Prompt: Photoshoot of sports shoe products located on a outdoor running route | Prompt: Photoshoot Product of Shoes Sports on rocky terrain, forest background |


Instead of using a quick mask, you can insert a mask image, which determines the areas of the picture to preserve. The image of the mask should be of the same size as the input image. The areas to be edited are pure white and the areas to preserve are clean black. The outpainting mode is a parameter to determine how the mask is treated. Use DEFAULT to pass smoothly between the masked area and the non -masked area. This way is generally better when you want the new background to use similar colors as the original background. However, you can get a halo effect if your quick demand requires a new background that is significantly different from the original background. Use PRECISE to strictly adhere to the boundaries of the mask. This way is generally better when you are making significant changes in the background.
This post demonstrates how to use outpainting to capture the accuracy of the product, and then turn a photo in the studio into various environments without problems. The following code illustrates the API demand structure for outpaining:
The following Python code demonstrates an outpaining -based background replacement by calling the Amazon Nova Canvas V1.0 in Amazon Bedrock. For more examples of the code, see examples of the code.
cleanse
When you have finished testing this solution, clean your resources to prevent AWS fees from being suffered:
- Turn Jupyter’s notebooks into the example of Sagemaker notebooks.
- Close and delete the example of the Notebook Sagemaker.
Cost Considerations
Consider the following costs from the solution set to AWS:
- You will suffer fees for the generating conclusion of it on the Amazon bed. For more details, refer to the prices of the Amazon Bedrock.
- You will suffer charges for your example of the Sagemaker notebook. For more details, refer to the Amazon Sagemaker prices.
cONcluSiON
In this post, we researched the practical applications of the Amazon Nova canvas for two high -impact business scenarios. You can now generate multiple design changes or different environments in minutes than hours. With the Amazon Nova canvas, you can significantly reduce the costs associated with the traditional creation of visual content. Refer to generating images with Amazon Nova to learn about other skills supported by Amazon Nova Canvas.
As the next steps, start with a single use case that closely matches your business needs. Use examples of our code given as a foundation and adapt to your specific requirements. Once you are familiar with the basic applications, explore the combination of multiple techniques and the degree gradually. Remember to track time savings and cost discounts to measure ROI. Contact your AWS account team for enterprise implementation instruction.
Around the author